
This is the follow-up post I promised in Building a Sustainable Kitchen. If you missed it, I walked through the habits and choices that make a kitchen more sustainable, and at the end I mentioned I had been growing my own vegetables and would share how. Well, this is that post. Everything I am about to share comes from real trial and error on my balcony, not from a textbook.
It Started With Something I Almost Threw Away
My kids love pechay. We cook it at least a couple of times a week, stir-fried with garlic, in sinigang, tossed into whatever is on the stove that night. Every single time I prepped it, I would cut off those bottom trimmings and toss them straight into the trash without a second thought. It was not until I started thinking more seriously about sustainable living, something I wrote about in Building a Sustainable Kitchen, that I started asking whether there was a better use for those scraps. Turns out, those trimmings are completely viable planting material. You press them into the soil, keep them moist, and within days you start seeing new growth pushing out from the base. That one realization completely changed how I look at kitchen waste.
Why Soil Is the Real Secret
Most people who try container gardening for the first time focus on the plant itself, what to grow, when to water, how much sunlight it needs. Those things matter, but they are secondary. The real foundation is the soil, and if you get that wrong, nothing else compensates for it. I am fortunate to have access to composted garden soil that has been building in the same spot for 25 years. Every kitchen scrap, dried leaf, coffee ground, and piece of organic matter from our household has been layering and breaking down there continuously, and what comes out of it is biologically alive in a way that store-bought potting mix simply cannot replicate. That kind of soil has a texture and nutrient density that you can feel the moment you put your hands in it. If you do not have 25-year compost yet, and most people do not, the important thing to understand is that you can start building it right now, today, with what your kitchen already produces every single day.
The Layered System: How I Build Every Container
This is the part I rarely see explained well in urban gardening guides, and it is the part that makes the biggest practical difference. Every container I plant in follows the same structure from the bottom up, and each layer has a specific job to do. Getting this right means your plants drain properly, your soil stays aerated, and you never have to guess whether your roots are sitting in stagnant water.
Layer 1: Rocks or small pebbles. The very base of every container gets a thin bed of rocks. They do not have to be large or uniform. Small stones, pebbles, whatever you have lying around will do. The point is to create air gaps at the bottom so water has somewhere to go after it passes through the soil above. Without this layer, water pools at the base, roots sit in it, and eventually the plant suffocates from the roots up. This single layer is the difference between a container that drains properly and one that quietly kills your plants over time.
Layer 2: Sand. A thin layer of sand on top of the rocks acts as a secondary filtration barrier. It keeps the soil above from compressing down and blocking the drainage layer below, while still letting water pass through freely and cleanly. You do not need a thick layer here. Just enough to create a clean transition between the rocks and the growing medium above.
Layer 3: Composted garden soil mixed with loam soil. This is where your plants actually live, and the mix matters more than most people realize. Garden soil alone is temperamental. Overwater it and it compacts into something almost clay-like. Let it dry out and it becomes powdery and starts repelling water instead of absorbing it. Loam soil solves both problems. When you mix the two together in the right ratio, you get a beautiful dark brown color, almost black, and that color is your target. It tells you the moisture content is right, the texture is balanced, and the soil is in the condition your plants need to thrive.
Reading Your Soil: The Color Test
One of the most practical things I have learned from years of doing this is that your soil tells you exactly what it needs. You just have to know how to read it. The color test is the simplest and most reliable monitoring tool I use, and it requires zero equipment whatsoever. When the soil is dark brown to near-black, moisture levels are good and you can hold off on watering. When it starts shifting toward light brown or grayish, that is your signal to water, not in an hour but right now. The goal is always to keep that soil dark, because that dark color is a direct reflection of biological activity and moisture retention working together. Once you start reading your containers this way, you stop guessing and start responding to what the soil is actually telling you.
The Coffee Grounds Method and Other Amendments
Between planting cycles, or whenever the soil starts looking tired and compacted, I use a few simple amendments that cost nothing because they come straight from the kitchen. Used coffee grounds are my most-used tool. I apply them to the surface of the soil, keep everything moist for about two days, then mix the grounds down into the second layer rather than leaving them on top. This adds nitrogen, improves drainage, and helps stabilize the soil structure without disturbing any roots near the surface. Crushed eggshells go in as well, mixed into the soil for calcium. This is especially important for fruiting plants like bell peppers, where calcium deficiency shows up as blossom end rot and ruins the harvest before it even starts. Kitchen refuse and occasionally animal droppings get composted into the base soil over time, which is exactly how that 25-year-old soil became what it is today. Nothing from the kitchen is waste. It is all future soil.
The Drainage Test: Know Before You Plant
Before I put a single trimming or seed into a container, I always run a simple drainage test that takes about thirty seconds and can save you weeks of frustration later. I pour water generously over the surface and watch what happens next. If it drains downward quickly and the surface does not pool, aeration is good and the container is ready to plant. If water sits on the surface and barely moves, the soil is compacted and needs to be loosened and remixed before anything goes in. I also run this test on existing containers periodically, because soil compacts over time and a container that drained well three months ago may not drain as well today. Catching compaction early, before it starts stressing your plants, is one of those small habits that makes a real difference over the long run. It takes thirty seconds and it is always worth doing.
How I Know the Soil Is Ready to Plant
Beyond the drainage test, there is a biological signal I look for before starting a new planting cycle: moss and weeds growing on their own. It sounds counterintuitive because nobody wants weeds in their containers, but spontaneous plant growth is nature’s way of telling you the conditions in that container are right. If uninvited plants are finding a way to grow, it means there is enough biological activity, moisture retention, and nutrient availability to support life. I let my containers rest for about a month between heavy planting cycles, and by the end of that rest period I am usually seeing moss at the edges and the occasional weed pushing through. That is exactly when I know it is time to plant again. That month of rest is not wasted time. It is the soil recovering and becoming more capable than it was before.

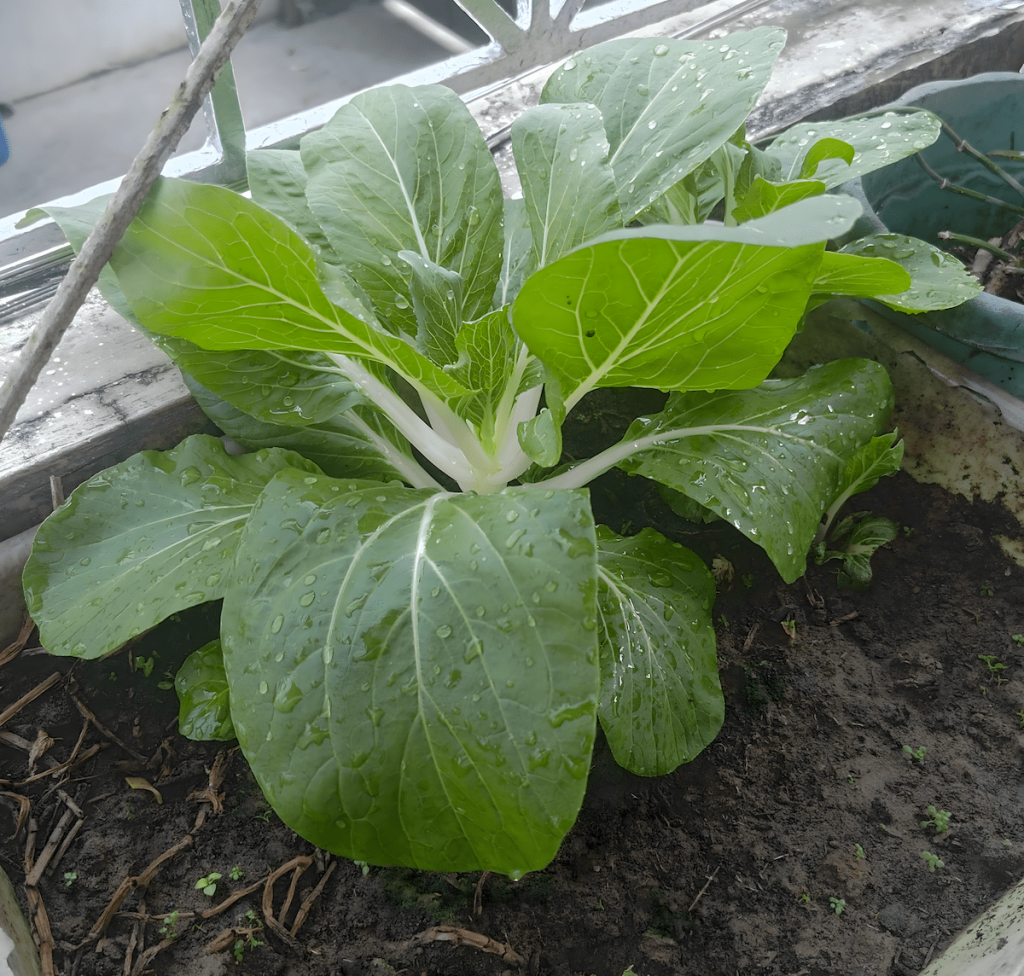
Growing Pechay: What I Did, Step by Step
Once the container was ready, the process was genuinely simple. I collected the bottom trimmings from pechay we were already prepping for dinner, the part that normally goes straight in the bin, and pressed them into the prepared soil, cut side down, deep enough to stay upright on their own. I planted 12 trimmings in one container, placed it on the balcony where it gets morning sunlight but stays shaded in the afternoon, and watered twice a day: once in the morning, once in the late afternoon before sunset. Pechay does not do well under intense afternoon heat because it can bolt and turn bitter, so that afternoon shade turned out to be an advantage rather than a limitation. By day three, the first signs of new growth were already visible. By the end of the first week, the plants were clearly establishing themselves, and those are the photos you see in this post. At around the two-week mark, I had a real harvest. Eight of the 12 trimmings had grown into full plants ready to eat, which is a 67% success rate on a first attempt with zero purchased inputs.
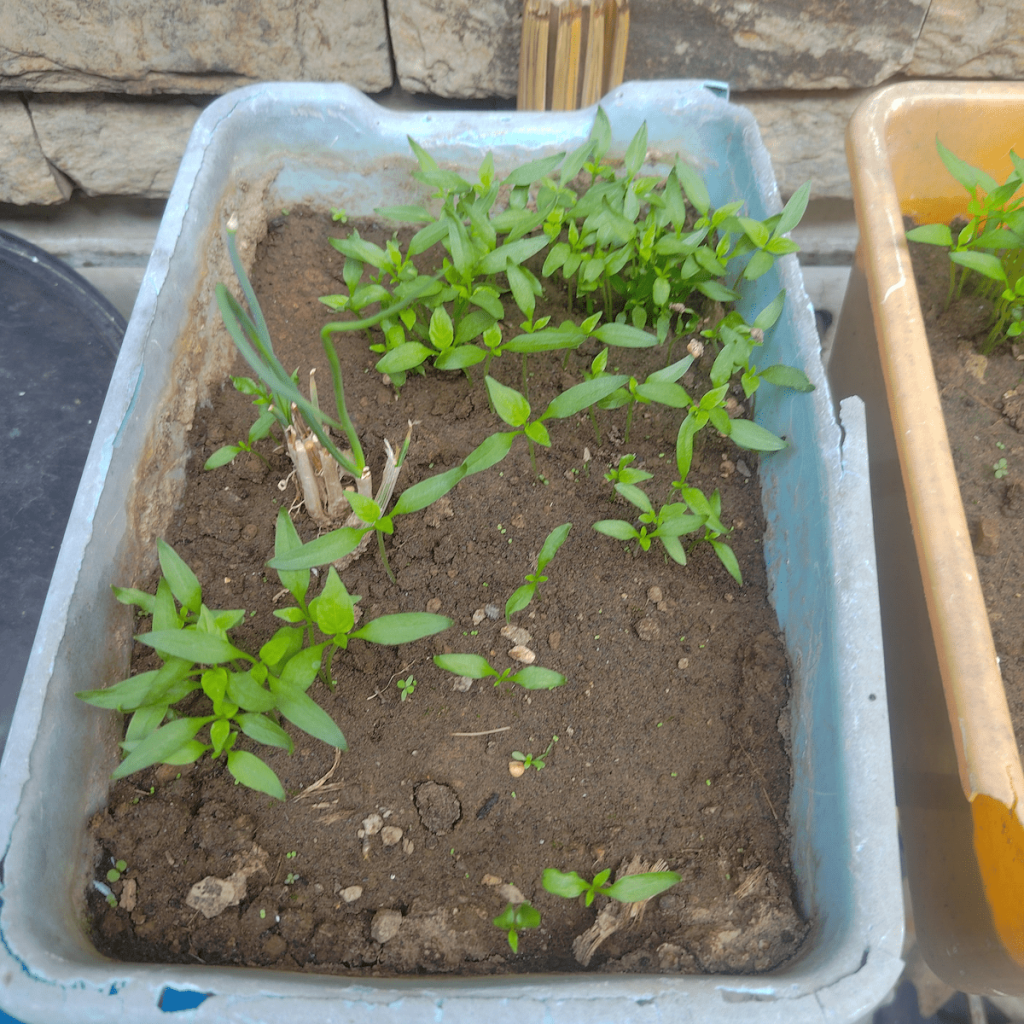
Bell Peppers and Siling Labuyo: Same Principle, Different Timeline
Encouraged by how well the pechay worked, I started applying the same logic to other kitchen scraps we were already producing. The next time we had overripe bell peppers, both red and green, I removed the core and simply sprinkled the seeds directly onto prepared soil in a separate container. I did the same with siling labuyo: overripe ones from the kitchen, seeds pressed into the same layered soil system. There were no seed trays, no pre-soaking, and no special treatment involved. These were just seeds from produce I would have thrown away, given good soil and consistent water. About two and a half weeks later, seedlings started breaking the surface in both containers. Bell peppers and siling labuyo take longer to reach harvest than pechay, somewhere between 60 and 90 days from seedling to fruit, but the process is identical and the cost is still effectively zero.
Why Homegrown Actually Matters for Your Health
I wrote about sustainable wellness and the connection between how we live and how we feel in an earlier post, and growing your own food sits right at the center of that conversation. Store-bought vegetables are typically harvested before they are fully ripe so they can survive transport and shelf time, and nutrient levels in produce drop significantly in the days after harvest. The pechay that sat in a cold storage facility for a week before reaching your supermarket is nutritionally a different product from what you pull off your balcony and cook that same afternoon. Pechay is rich in Vitamin C, Vitamin K, calcium, and folate, but those levels are at their peak right after harvest, not after a week of refrigeration and transport. And then there is the pesticide question. Commercially grown vegetables are regularly sprayed, and when you grow your own using composted organic soil, you control every single input from the ground up. Beyond the nutrition, research consistently shows that tending to plants reduces cortisol levels and supports mental wellbeing in measurable ways. Your balcony garden is doing more for you than just providing dinner.
What Is Coming Next: The Bottle Tower Build
The next project I am working on takes this same zero-waste philosophy and applies it vertically. The plan is a bottle tower system built from repurposed 1-liter Coke bottles. The process involves cutting the bottom off each bottle, flipping it upside down, poking a small hole in the base, and filling it with the same layered soil system: rocks, sand, composted garden soil, and loam soil on top. Multiple towers stacked or arranged vertically means maximum plant density in minimum floor space, all from materials that would otherwise be recycled or discarded. It is the same thinking that started with those pechay trimmings. Nothing is waste if you are willing to see it differently. I will document the full build with photos and share it here as a follow-up, so if you want to see how that comes together, keep an eye out for Part 2.
You Do Not Need a Yard, a Budget, or a Green Thumb
Everything in the photos in this post was grown on a balcony, in plastic containers, with scraps from our kitchen and soil that has been quietly building for decades. There is no special equipment, no expensive fertilizer, and no expertise required beyond a willingness to pay attention to what your soil is telling you. The barrier to starting is genuinely lower than most people think. One container, the right layers, your pechay trimmings, and consistent watering twice a day is all it takes to get started. If you want to eat cleaner, reduce your grocery dependence even slightly, and do something that is genuinely good for your mental health at the same time, this is one of the highest-return habits I have found. Start with pechay. It is forgiving, it is fast, and the first harvest will make you want to keep going.
For the full technical breakdown, including the exact layering method, the drainage test, the vertical tiered stand passive irrigation system, and the upcoming bottle tower build, head over to HobbyEngineered where I cover the urban farming side of this project in detail.
Related Posts:
- Building a Sustainable Kitchen: Simple Tips for Greener, Healthier Meals
- Sustainable Wellness: A Holistic Approach to Health
- Healthy Eating for All: Filipino-Inspired Meals for a Balanced Life

Grew pechay from kitchen trimmings on a balcony because throwing food away felt wrong.
Founded HealthyForge.com because health advice should come from people who actually live this way, not just write about it.
Writes about food, nutrition, and sustainable habits for people who are tired but still trying.
📱 Medium • Facebook • YouTube
Written for the resilient, not the aesthetic.